
Overview
In an era where automation is a huge help for IT administrators, the task of changing wallpapers and lock screen backgrounds has become a real headache for many of us.
Administrators are constantly being asked to switch up wallpapers and lock screen backgrounds for special events like holidays or announcements. While this might seem like a small task to the average user, admins are often required to make changes on a monthly basis.
I work for a SaaS company where the majority of what we deploy is automated. Despite this, we still receive requests to update wallpapers for customers, which means adjusting our automation processes to accommodate these requests.
One of our new customers has a wide range of “personas” across different business units. They want to update the wallpaper for most personas monthly! While this is technically possible, what was once a “nice-to-have” option has now become a burdensome chore for the unlucky admin.
But not anymore!
Prerequisites
- Access to uploading applications to Intune
- Knowledge of using IntuneWinAppUtil to convert the Install.ps1 script to an .intunewin file.
- A static URL for the wallpaper and/or the lockscreen background. This should be a publicly accessible URL, which means it can be hosted on a public Azure storage account, AWS storage, or even a public GitHub repository.
- Note: Grant access to the marketing team for uploading files – it’ll be beneficial in the long run!
How does the dynamic wallpaper and lock screen win32 app work?
The application, which can be downloaded from my GitHub, allows administrators to package one application for both the wallpaper and the lock screen background, making it easy to set and forget.
The script is equipped with full error handling and logs to %programdata%\DynamicURL\Logs. It also stores downloaded images in %programdata%\DynamicURL\Images.
The Install.ps1 script checks for a static image URL to see if the image Etag (identifier for a version of the image) has changed. If the image was changed, the script will download the new image, set up a few registry keys, and then set the image as a new wallpaper or lock screen.
Details of Install.ps1:
The script is called with one or two functions, -DesktopImageUrl and/or -LockScreenImageUrl, if you’re calling it with -DesktopImageUrl, then you just need to specify the wallpaper URL. Something likeInstall.ps1 -DesktopImageUrl "https://raw.githubusercontent.com/ahmadaoun/DynamicWallpaper/main/SampleImages/Desktop.png"
Similarly, the lockscreen background needs to be called with the URL. You can call one or both in the same scripts with something likeInstall.ps1 -DesktopImageUrl "https://raw.githubusercontent.com/ahmadaoun/DynamicWallpaper/main/SampleImages/Desktop.png" -LockScreenImageUrl "https://raw.githubusercontent.com/ahmadaoun/DynamicWallpaper/main/SampleImages/LockScreen.png"
The below examples are for the desktop wallpaper function, but a similar function applies to the lockscreen background function.
The script will get the file Headers.Etag
$response = Invoke-WebRequest -Uri $DesktopImageUrl -Method Head -ErrorAction Stop
        if ($response.StatusCode -eq 200) {
            Write-Host "File found at $DesktopImageUrl"
        } else {
            Write-Error "File not found at $DesktopImageUrl (Status code: $($response.StatusCode))"
            return
        }
It checks if the hash exists in the registry path HKLM:\Software\DynamicWallpaper\ – on the first run it will obviously not find it, so it will download the image to %programdata%\DynamicWallpaper\ and then set the image accordingly.
It will then write the image hash and URL to the HKLM:\Software\DynamicWallpaper\ path. The URL is needed later for the detection.
if (-not (Test-Path $RegistryPath)) {
            New-Item -Path $RegistryPath -Force | Out-Null
            Download-Image -Url $DesktopImageUrl -Destination $DesktopImagePath
            Set-Wallpaper -DesktopImagePath $DesktopImagePath
            Update-RegistryKey -KeyName $DesktopRegistryKeyName -HashValue $DesktopImageHash
        } elseif ($CurrentDesktopImageHash -ne $DesktopImageHash) {
            Write-Host "Image has changed. Downloading..."
            Download-Image -Url $DesktopImageUrl -Destination $DesktopImagePath
            Set-Wallpaper -DesktopImagePath $DesktopImagePath
            Update-RegistryKey -KeyName $DesktopRegistryKeyName -HashValue $DesktopImageHash
        } else {
            Write-Host "Image has not changed."
        }
To set the image as a wallpaper or as a lockscreen background, the script will set the PersonalizationCSP accordingly.
$DesktopPath = "HKLM:\SOFTWARE\Microsoft\Windows\CurrentVersion\PersonalizationCSP"            if (-not (Test-Path -Path $DesktopPath))
{New-Item -Path $DesktopPath -Force | Out-Null}
            Set-ItemProperty -Path $DesktopPath -Name "DesktopImagePath" -Value $absolutePath
            Set-ItemProperty -Path $DesktopPath -Name "DesktopImageUrl" -Value $DesktopImageUrl
            Set-ItemProperty -Path $DesktopPath -Name "DesktopImageStatus" -Value 1
The Detect.ps1 script will check whether the registry keys for the DesktopImageURL and/or the LockScreenURL exist, if they do, then it will check the URL for the image Etag and cross check it with the DesktopImageHash and/or the LockScreenImageHash keys. If the Etags match the values in the registry, then it will return “Detected”, if they don’t, then the Install.ps1 will run again and set the new images as the wallpaper or the lockscreen background.
if ($DesktopImageUrl) {
    $DesktopImagetrue = $true
    $DesktopRegistryKeyName = "DesktopImageHash"
    $CurrentDesktopImageHash = (Get-ItemProperty -Path $RegistryPath -Name $DesktopRegistryKeyName -ErrorAction SilentlyContinue).$DesktopRegistryKeyName
    $DesktopImageHash = (Invoke-WebRequest -Uri $DesktopImageUrl -Method Head).Headers.ETag
    $DesktopImageHash = $DesktopImageHash -replace '^[^"]+"|"[^"]*$', ''

    # Compare hashes
    if ($CurrentDesktopImageHash -eq $DesktopImageHash) {
        $desktopSuccess = $true
    }
}
This is how it converts the $output from one or both functions to a single $output for detection purposes:
if ($DesktopImageUrl -and $LockScreenImageUrl) {
    if ($desktopSuccess -and $lockScreenSuccess) {
        $output = "Detected"
    }
} elseif ($LockScreenImageUrl) {
    if ($lockScreenSuccess) {
        $output = "Detected"
    }
} elseif ($DesktopImagetrue) {
    if ($desktopSuccess) {
        $output = "Detected"
    }
}
write-host $output
Summary
In short, with the DynamicWallpaper app, the marketing team can manage their own deployment of new wallpapers and lockscreen backgrounds. All they need is access to the storage account and to replace the existing image on with the new image making sure the name is the same so that the URL doesn’t change. And, within 8h (give or take 8h), the detection on the win32 app will run and the new image will get deployed.
Limitations
- The desktop wallpaper requires a device reboot for it to apply.
- The CSP settings used in this app are limited to Enterprise SKUs
- When you create an app with a single function, such as setting a desktop wallpaper or lockscreen background, the app is restricted to that single function. If you want to add a second function later on, you will need to either create a new app that includes both functions with the install command, or create a separate app for the second function.
- Files created by a system user in the %programdata% location are not editable by standard users, unless the user had pre-empted the app running and pre-created the image files before the app runs. In that case, the user would then have full read/write access to the files the app creates. Thanks @schenardie for the heads up!
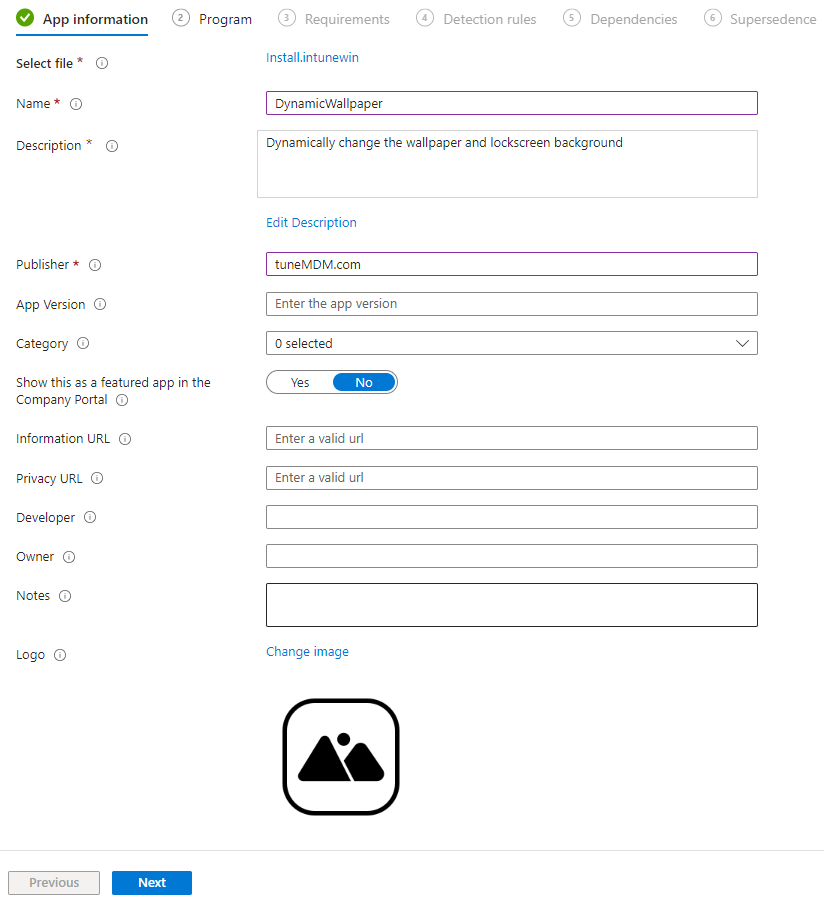
How to setup the DynamicWallpaper app on Intune?
- Download the DynamicWallpaper script
- Download the IntuneWinAppUtil.exe
- Convert the Install.ps1 to Install.intunewin file
- Create a new Win32 app on Intune
- Select the Install.intunewin file
- Give the app a Name, Description, and Publisher
- Add any other details and click Next
- For the Install command add the below.
Note: Change the URLs to your own URL
%windir%\sysnative\windowspowershell\v1.0\powershell.exe -executionPolicy bypass -windowstyle hidden -file "./Install.ps1" -DesktopImageUrl "https://raw.githubusercontent.com/ahmadaoun/DynamicWallpaper/main/SampleImages/Desktop.png" -LockScreenImageUrl "https://raw.githubusercontent.com/ahmadaoun/DynamicWallpaper/main/SampleImages/LockScreen.png" - You can type anything in the Uninstall command, you cannot leave it blank
- Click Next

- Add the requirements
- For detection, select Use a custom detection script
- Select the Detect.ps1 file you downloaded
- Leave the rest as default and click Next
- Add the assignments to your needs
- Click Next then Create
Future versions of the script will support uninstall commands. I shall update this post once done.

Leave a comment